HOW TO DECIDE ON THE BEST STRATEGY WHEN RECOVERING LOST OR DELETED FILES
How to Decide on the Best Strategy When Recovering Lost or Deleted Files
No matter how hard we’d try to protect our precious files, sooner or later, any of us may come up against data loss. Whether it’s deleting important documents, formatting an SD card of a photo camera or having a device infected with malware, the reality hits – the information has gone, and it is not something that’s easy to accept.
If you are a non-technical person, you will probably start googling phrases like “data recovery” or “restore deleted files”. Yet, an online search, instead of clearing things up, is likely to make them even more confusing. Vast arrays of options and a flood of controversial recommendations cannot but complicate decision-making. Hopefully, all this can be avoided if you are already prepared, with a reliable recovery strategy in place. Above all, being aware of the best practices will help you to minimize errors and increase the chances of retrieving that data unharmed.
What Is Better, Data Recovery Software or Services?
This is an age-old question to which there is no simple answer. Here you will need to consider many variables, such as your budget, complexity of the problem, importance of the data and whether you are ready to dedicate your own time to that matter. Professional services are costly, but they can save you the trouble of delving into the process and its details. You will just have to contact the lab, brief them in and get a clear course of action to follow. On the other hand, if you are concerned about the financial or privacy aspects, data recovery software would be a perfect alternative to hiring specialists. Modern apps are equipped to handle practically any case of logical data loss – from accidental formatting or deletion of files to storage corruption caused by software crashes or power failures. The most important exception here is the presence of any physical defects on the storage medium. If the device behaves unusually, produces any strange sounds, overheats, slows down significantly or refuses to boot at all, you have the ultimate reason to seek professional help. Any attempt to handle hardware issues yourself, without due experience or tools, will result in more severe data loss. The same goes for situations where the data is life-critial and will be used in court or participate in other legal procedures. Such sensitive data must be approached with utmost caution, while all data recovery activities must be documented according to established standards and regulatory requirements.
What Are the Main Don’ts in the Data Recovery Process?
Whilst in case of data recovery services everything is clear enough – you just stop using the device, disconnect it and follow the instructions provided by the engineers – DIY data recovery usually comes with many uncertainties. Anyway, you will need to act reasonably and avoid the common mistakes that may cause further damage to your files:
Don’t keep using the affected storage device. You need to try to preserve the original state of the data at all costs. Otherwise, it is fairly easy to overwrite the lost files, not only by saving new information to this storage, but also by installing software or even by running applications. The highest possibility of overwriting is inherent to the system drive. Considering many writing operations may be performed by the OS in the background without the user’s will, it is usually recommended to remove this drive from the initial computer and connect to another PC as a secondary device.
Don’t tamper with the drive’s logical structure. It is highly important to keep from any “repair” attempts on the problem storage. While most users do not risk dismantling the device and doing any physical fixes, the same cannot be said about the drive’s logical layout. Yet, the file system, partition table and other crucial components of its logic are just as easy to break. Various popular system repair tools, like Chkdsk or Fsck, often make destructive modifications and may fix the storage structure, but at the price of wiping valuable files. A similar situation is with formatting or OS reinstallation – these operations may also complicate further data recovery efforts or even reduce them to nil.
Don’t handle the device negligently. Any physical stress may worsen the drive’s condition, leading to its failure. That is why you should place it onto a flat stable surface, free from shocks, vibrations, fluids or dust, and protect it from static electricity. In addition, ensure that the drive is not exposed to excessive heat or cold. In case it starts overheating, take care of proper cooling. And, in general, try to treat it with maximum care to avoid any potential complications.
Don’t ignore any signs of physical damage. If you notice any symptoms of a hardware malfunction during the procedure, you should immediately stop all the manipulations and contact a professional data recovery service. Attempts to recover the data from a defective device without sufficient expertise will make matters worse, reducing the chances for successful recovery.
Don’t install data recovery software onto the same partition/drive. A data recovery utility should be installed and launched from a different partition or drive, the one that doesn’t contain the lost files. Otherwise, it can overwrite the very same data you are supposed to recover, even before you start the retrieval process. One possible safe approach is to run the program from a bootable USB stick (Live CD).
Don’t save the recovered files to the same drive. Copying files to the same drive from which they were missing may overwrite the locations on it where the lost data still resides. All overwritten portions of it will become irretrievable, and you are likely to receive poor or even unusable results, without the possibility to start from scratch and repeat the procedure. Instead, consider using any separate external drive or a capacious network storage as the destination.
Don’t use “indirect” connection for external storage devices. Some electronic gadgets, including smartphones and digital cameras, may rely on removable cards for the primary storage. More often than not, you might be able to browse or manage their content after connecting the base device to a computer. However, this kind of access is usually just a virtual imitation providing a limited view of the file system, and it is not suitable for data recovery. To enable a data recovery program to work directly with the actual file system, you have to take that memory card out of your gadget and insert it directly into the slot of a PC/laptop or find a dedicated USB memory card reader.
Don’t try to rebuild RAID or reset your NAS to the factory defaults. These operations write new data to the RAID or NAS drives, overwriting the existing storage configurations. So, any of them can lead to irreversible data loss and should be initiated only after the lost files have been rescued. Resetting a NAS also typically involves formatting its drives, which may erase all the available data and make it irrecoverable in case of a full format.
Considering these no-no’s, all you have to do is to stop any activities that could write anything to the affected drive, if necessary, disconnect the device from the original system and then plug it into another PC, responsible for hosting the subsequent data recovery procedure. The next crucial step will be, of course, the use of data recovery software.
Which software is better to choose for DIY data recovery?
When choosing data recovery software, you need to ensure that the program will be reliable, effective and fitted for your specific needs. For this, you should study it from the perspective of the following characteristics:
Safe for your data. Look for the software that operates safely, using non-destructive methods that cannot make any changes to the source storage. It should only read the data, create its “virtual copy” and perform all recovery manipulations only on that copy, without affecting the original information. Do not run any tools that suggest any direct “fixes” or “repair” operations.
Reputable. Opt for the software that is well-accepted in the data recovery industry, especially tools recommended by IT professionals on their forums. Avoid over-marketed products whose vendors may make exaggerated claims about their capabilities, like guaranteeing 100% data recovery, which is virtually impossible. Instead, focus on utilities that have clear, honest descriptions of their features and limitations.
Compatible with your:
- Type of storage. Research the program’s technical specifications to find out if it is capable of working with the type of storage device you need to recover data from, for example your internal or external hard drive, USB stick, memory card, RAID set or NAS device. Yet, bear in mind that when the device employs some specific technology, like encryption, virtualization, thin provisioning, etc., a more advanced tool may be needed for data recovery, geared to support that very technology.
- File system type. The application must support the file system your storage relies on. Simple utilities usually cover the most common file system types used by Windows, Linux and macOS, but less widespread (e.g., ReFS, ZFS, Btrfs) or proprietary formats found in some devices would require specialized software.
- Operating system. The program should be able to run under your operating system, whether it’s Windows, macOS or Linux. The software may also be cross-platform, allowing you to recover data across different OS environments.
Corresponding to your level of skills. If you are not particularly tech-savvy, consider a program with an intuitive interface, one that would guide you through the recovery procedure and require minimal technical knowledge. In contrast, if you have certain technical expertise, you may decide on more complex software, able to provide you with greater control over the recovery process, offer expanded configuration possibilities and various advanced options.
For those searching for data recovery software that would align well with the aforesaid criteria, there are several products worth looking into: Recovery Explorer and Raise Data Recovery. Both of them are multiplatform and broadly recognized for their safety, ease of use and effectiveness. With their help, you can handle the majority of simple devices formatted by Windows, macOS and Linux, as well as many other RAID-based appliances like NAS (though for the latter you have to remove the drives from the NAS box).
- Raise Data Recovery
If you’re completely new to data recovery and need something really simple, Raise Data Recovery will be a great point to start – thanks to its user-friendly interface and in-built guidance, the process will be smooth and straightforward, without any efforts from your side.
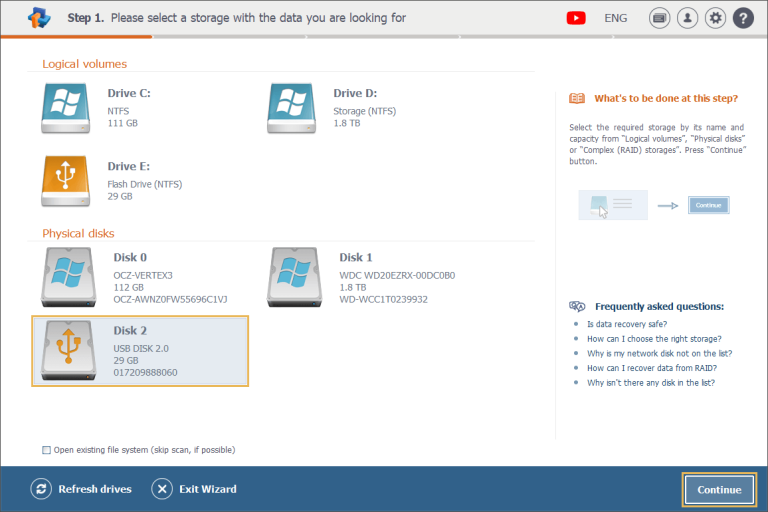
Having installed and launched the application, you will just have to choose the storage device or a logical volume from which you’ve lost your data and then start its scan.

After that, you will be able to track the scan’s progress, being aware of how many of your files have been restored so far.

Once the program completes the process, you can easily navigate through the restored content and select all the items you want to save. This can be done by browsing the folders and files as they were originally presented on the storage or organized into separate catalogs according to their types, like documents, photos, archives, etc.

And, finally, you can provide a safe location for the recovered data and wait until it gets copied.

Recovery Explorer
In case you are already familiar with the process and need something a bit more advanced, Recovery Explorer will offer you a wider range of features, catering to both beginners and more experienced users. The software supports a broader set of file systems, will let you work with disk images or virtual disks and provides more adjustable settings.
When using the program, you can choose between two modes of operation. If you prefer to have a higher level of control, you can go for the regular mode, with more extensive configuration options and some extra tools, enabling a more thorough recovery process.

On the other hand, if you’re seeking simplicity, the software also includes a Wizard-based mode that actually mirrors the intuitive interface of Raise Data Recovery.

The RAID-Edition of the software builds on the Standard version but adds specialized tools for reconstructing and recovering data from RAID. It supports various RAID levels (RAID 0, RAID 1, RAID 5, RAID 6, RAID 10, etc.) and can manage cases involving some RAID-like configurations, including Windows Dynamic Disks, Microsoft Storage Spaces, Apple Fusion Drive (based on APFS), Linux LVM, Synology Hybrid RAID, Btrfs-RAID and others.

The Professional-Edition of the software comes with everything the RAID-Edition has, except the Wizard-based mode. At the same time, it can boast rich professional-level functionality. You can rely on it to recover data from less common file systems, like ZFS or F2FS, encrypted volumes, virtual machines and many complex storage architectures, like LVM with Thin Provisioning, Drobo BeyondRAID and ZFS RAID-Z. Along with that, it provides a variety of advanced tools for storage access, low-level data analysis and other manipulations.

In a nutshell, when you need to recover lost or deleted files, having a clear plan will save you from hasty decisions that can easily make things worse. Figure out what caused the data loss, apply the right tools for your situation and avoid those typical mistakes to improve the odds of successful data recovery.
Comments